Wednesday, 27 November 2024

Surveying and Levelling :STUDY OF ELECTRIC TOTAL STATION : Practical 10

 Aim: To study the general introduction of total station survey. 

Introduction: 

 A total station is an electric/optical instrument used in modern surveying. It is also used

by archaeologists to record excavations as well as by police, crime scene investigators, private

accident deconstructionists and insurance companies to take measurements of scenes.

 Furthermore, they can make computations with angle and distance measurements and

display the result in real times. 

They are used for; 

Topographic Surveys 

Hydrographic surveys 

Cadastral surveys 

Construction surveys 

The total station is an electric Theodolite (transit) integrated with electric distance meter (EDM)

to read distance from the instrument to a particular spatial entity. Some models include internal

electric data storage to record distance, horizontal angles, and vertical angle measured, while

other models are equipped to write these measurements to an external data collector, which is a

hand-held computer. 

Angles and distance are measured from total station to points under survey, and the coordinates

(X,Y and Z or northing, easting and elevation) of surveyed points relative to the total station

position are calculated using trigonometry and triangulation. 

Data can be downloading from the total station to a computer and application software used to

compute results and generate a map of the surveyed area. 

Most modern total station instruments measure angles by means of electro-optical scanning of

extremely precise digital bar-code etched on rotating glass cylinders or disc within the 

instrument. The best quality total stations are capable angles to 0.5 arc-second. Inexpensive

“construction grade” total station generally measure angles to 5 or 10 arc-second. 

Measurements of distance is accomplished with a modulated microwave or infrared carrier

signal, generated by a small solid- state emitter within the instrument’s optical path, and reflected

by prism reflector or object under survey. The modulation pattern in the returning signal is read

and interpreted by the onboard computer in the total station. The distance is determined by

emitting and receiving multiple frequencies, and determining the integer number of wavelengths

to the target for each frequency. Most total stations use purpose-built glass porro’s prism

reflectors for the EDM signal, and can measure distance to a few kilometers. The typical total

station can measures to about 3 millimeters 1/1000th of a foot.  

Reflector less total stations can measure distances to any object that is reasonably light in color,

to a few hundred meters. 

Characteristics of Total Station Instrument: 

They combine three basic components: 

1. an electric distance measuring

2. an electric angle measuring components

3. a computer or microprocessor 


These devices can automatically measure horizontal and vertical angles, as well as slope distance

from the single setup. 

Parts of a total station instrument 

The upper part of total station instrument (alidade) includes 

1. Telescope 

2. Graduated circle  

3. All other elements necessary for measuring angle and distances. 

Functions performed by total station instruments

1. In additional to providing guidance to the operator, microprocessors of total stations can 

perform many different types of computations;

2. Averaging of multiple angle and distance measurements

3. Correcting electronically measured distances for prism constants, atmospheric pressure 

and temperature.

4. Making curvature and refraction corrections to elevations determined by trigonometric 

leveling.

5. Reducing slope distances to their horizontal and vertical components.  


Uses of Total Station: 
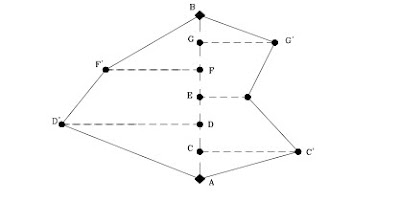
The total station instrument is mounted on a tripod and is levelled  by operating
levelling screws. Within a small range instrument is capable of adjusting itself  to the
level position. Then vertical and horizontal reference directions are indexed using
onboard keys. 
When target is sighted, horizontal and vertical angles as well as sloping distances are
measured and by pressing appropriate keys they are recorded along with point number 
Result: 
Thus the working of Total station is studied. 


Surveying and Levelling :LEVELLING : Practical 9

 LEVELLING

DESCRIPTION OF THE INSTRUMENTS: -

The level: -

The instrument  which is used for measuring related elevations is known as a level and consists 

of the following parts.

       1.      A telescope to provide a line of sight.

       2.      A level tube to make the line sight horizontal.

       3.      A leveling head to bring the bubble of the level tube at the center of its run.

       4.      A tripod head to support the above three parts of the level. 

Types of level: -

The dumpy level: - 

           1.  This consists of a telescope rigidly fixed to its support.

           2.  It can neither be rotated about it longitudinal axis nor it can be removed from its support. 

The wye level: -

           1. The telescope is supported in Y supports and is not rigidly fixed to the supports.

           2.  The telescope can be removed from the supports reversed end to end and can be revolved 

about its longitudinal axis.

The reversible level: - 

          1. The telescope can be rotated about its longitudinal axis in the sockets and also can be

withdrawn from its sockets and replaced end for end. 

The tilting level: -

  1.  The telescope can be tilted within few degree in vertical plane by a tilting screw.

  2.  This designed for precise work. 

Temporary adjustments of the dumpy level: -

a) Setting up the level: - 


1.  This includes fixing the instrument on the tripod and levelling the instrument 

approximately by leg adjustment. 

2.  To do this release the clamp hold the instrument in the right hand and fix it on a tripod

by turning rounded the levelling head with left hand. 

3.  The tripod legs are adjusted so that the telescope is at a convenient height and is leveled

approximately. 

b) Levelling up: -

1.   This is done with the help of three-foot screws and by using plate levels.

2.   The object of levelling is to make its vertical axis truly vertical. 

  3.   First loosen the clamp screw and turn the instrument until the longitudinal axis of the

bobble tube is parallel to a joining any two levelling screws (say A and B). 

4.   Holding these two foot screws with the thumb and first finger of each hand turn them

uniformly so that the thumbs move either towards each other on away from each other until

the bubble comes to the center of the tube. 

5.    Rotate the upper plate through 90° until the axis of the plate level coincides a line joining

the third foot screw C and the midpoint of the first two screws A and B. 

6.   Hold the third with the thumb and find finger of the right hand and turn it until the plate

bubble is central. 

7.   Rotate the upper plate through 90° to its original position and repeat step 4 till the bubble is

central. 

8.    Rotate again through 90 and repeat step 6.

9.    Repeat steps 4 and 6 till bubble remains central in both the position.

10.  Rotate the instrument through 180° and in this position the bubble should remain central if 

the instrument is in adjustment.

Elimination of parallax: - 

1. Parallax is a condition arising when the image formed by the objective is not in the plane

of the cross hairs. 

2. To get accurate sighting those should be eliminated and this is done.

3. By focusing the eyepiece for distinct vision of the cross hairs and 

4. By focusing the objective to bring the image of the object in the plane of cross hairs.

Focusing the eyepiece: - 

1.  Direct the telescope either towards the sky or hold a sheet of white paper in front of the

objective. 

2.  Move the eyepiece in or out till the cross hairs appear distinct.

Focusing the objective: - 

1.   Direct the telescope towards the leveling staff.

2.   Turn the focusing screw till the image appears clear and sharp.

3.   The image formed must be in the plane of cross hairs. 

DEFINITIONS

Important terms: - 

            The following are the important terms used during levelling.

1. Level surface: -

            A level surface is any surface parallel to the mean spheroidal surface of the earth.

2. A level line: -

            It is a line lying in a level surface and normal to the plumb line at all points.

3. A horizontal plane: -

            A horizontal plane through a point is a plane tangential to the surface at that point.

4. A horizontal line: -

            It is a line lying in the horizontal plane.

5. Vertical line: -

            Vertical line any point is a line normal to the level surface through that point.

6. Vertical plane: -

            A plane is a plane containing a vertical line.

7. Datum surface: -

            It is any arbitrary assumed level surface form which vertical distances are measured. 

8. Elevation: -

            Elevation of a point is its vertical distance above or below the datum also known as 

reduced level (R.L)

9. Bench mark: -

            It's fixed reference point of known elevation.

10. Line of collimation: -

            It is the line joining the intersection of the cross hairs to the optical center of the object 

glass and its continuation also known as line of sight.

11. Axis of telescope: -

            It is the line joining optical center of the object glass to the center of the eyepiece.

12. Vertical axis: -

            It is the center line of the axis of rotation.

13. Back sight (B.S): -

            It is a staff reading taken on a point of known elevation (i.e.) on Bench Mark or change 

point, and is the first reading taken after the level is set up and leveled.


14. Fore sight (F.S): -

            It is a last staff reading on a point whose elevation is to be determined as on a change 

point.

15. Intermediate sight: -

            It is any other intermediate staff reading taken on a point of unknown elevation from the 

same set of the level.

16. Change point: -

            It is a point denoting the shifting of the instrument. It is a point on which the back and 

foresights are taken.

17. Station: - 

            It is a point whose elevation is to be determined or a point which is to be established at a

given elevation. 

18. Height of instrument: -

            It is the elevation of the plane of collimation when the instrument is correctly levelled. 


Surveying and Levelling :STUDY OF THEODOLITE : Practical 8

 STUDY OF THEODOLITE 


Aim: 

To study about the Temporary and Permanent adjustments of a Theodolite.  

Instrument used:  

Theodolite  

ADJUSTMENTS OF THEODOLITE  

The Theodolite should be properly adjusted to obtain accurate observations. The adjustments are

mainly of two types. They are as follows:  

1. Permanent adjustments and  

2. Temporary adjustments.  

1. Permanent adjustments  

The permanent adjustments are to be done to maintain the required standard relationship between

the fundamental lines (axes) of a Theodolite. The fundamental lines are as follows:  

a. Vertical axis  

b. Horizontal axis or trunnion axis  

c. Line of collimation or line of sight  

d. Axis of plate level  

e. Axis of altitude level.  

Required relations between the fundamental lines (axes) 

i) The axis of plate level must be perpendicular to the vertical axis.  

ii) The line of collimation must be perpendicular to the horizontal axis  

iii) The horizontal axis must be perpendicular to the vertical axis.  


iv) The axis of the altitude level must be parallel to the line of collimation.  
v) The vernier reading of vertical circle must read zero when the line of collimation is horizontal.  
The permanent adjustments of a Theodolite are:  
 Adjustment of plate level. 
 Adjustment of line of sight 
 Adjustment of horizontal axis 
 Adjustment of altitude bubble and vertical index frame.  
2. Temporary adjustments  
The adjustments which are carried out at every setting of the instrument before the observations
are referred as temporary adjustments. There are three types of temporary adjustments as
follows. 
a. Setting up  
b. Levelling up  
c. Elimination of parallax.  
a) Setting up  
This adjustment includes the following two operations.  
i. Centering the Theodolite over the instrument station.  
ii. Approximate leveling of Theodolite with the help of the tripod legs only.  
Centering  
It is the operation by which the vertical axis of the theodolite represented by a plumb line is
made to pass through the mark of instrument station on the ground.  
Approximate levelling
The approximate leveling may be done with the reference to a small circular bubble provided on
the tribrach or by eye judgements.  
b) Levelling up  
The operation of making the vertical axis truly vertical is known as leveling of the Theodolite.
After the centering and approximate leveling an accurate leveling is to be done with the help of
foot screws.  

i) First the telescope is to be kept parallel to any of the two foot screws as in the figure.  
ii) The bubble of plate level is to be brought to the centre of its run by turning the foot screws
either inwards or outwards simultaneously.  
iii) Then the telescope is to be turned through 90°, so that it lies over the third foot screw (i.e
perpendicular to the first position)  
iv) The bubble is to be brought to the centre of its run by turning the third foot screw either
clockwise or anticlockwise.  
v) Then the telescope is brought back to its original position (position at (i)) and the position of
bubble is checked whether it remains in the center or not.  
vi) If the bubble is not in centre the above operations are repeated till the bubble retain at centre
in both the positions.  
c) Elimination of parallax. 
An apparent change in the position of an object caused by the change in position of the
observer’s eye is known as parallax. This can be eliminated in two steps.  
i) Focusing the eye piece for distinct vision of the cross hairs.  
ii) Focusing the objective to bring the image of the object in the plane of cross hairs.  
i) Focusing the eye piece  
The telescope is to be pointed towards the sky or a sheet of white paper is to be hold in front of
the objective.  
The eye piece is to be moved in or out by rotating it gradually until the appearance of cross hairs
becomes sharp and distinct.  
ii) Focusing the objective  
Telescope is to be directed towards the object. Focusing screw is to be turned until the
appearance of the object becomes sharp and clear. 
 

Monday, 25 November 2024

Surveying and Levelling : COMPASS TRAVERSING – MEASURING BEARINGS & ARRIVING INCLUDED ANGLES : Practical 7


COMPASS TRAVERSING – MEASURING BEARINGS & ARRIVING

INCLUDED ANGLES 

Aim: Measurement of bearings of sides of traverse with prismatic compass and computation of

correct included angle.  

Instruments Required: Prismatic compass, ranging rod, chain, tape, peg Tripod stand  

Procedure:  

1) Four ranging rods are fixed at different points i.e. A, B, C, D etc. such that it should be

mutually visible and may be measured easily.  

2) Measure the distance between them. 1) At point A the prismatic compass is set on the tripod

Stand, centering and leveling is then properly done. 2) The ranging rod at B is ranged through

sighting slits and objective vane attached with horse hair and reading on prismatic compass is

noted down.  

3) It is fore bearing of line AB. Then the prismatic compass is fixed at B and ranging rod at C

and A are sighted. And reading is taken as forbearing of BC and back bearing of AB. 

 4) Repeat the same procedure at the stations C, D etc. 


Surveying and Levelling : STUDY OF COMPASS SURVEYING : Practical 6

 COMPASS TRAVERSING 

STUDY OF COMPASS SURVEYING


DESCRIPTION OF THE INSTRUMENTS

A. Prismatic Compass:- 


1. A magnetic needle is attached to the circular ring made up of aluminum. 

2. The needle is on the pivot to orient N and S ends.

3. The line of sight is defined by object vane and eye slit both attached to the compass 

bar.

4. The object vane consists of a vertical hair attached to a suitable frame while the eye 

slit consist of a vertical slit above the prism unit.

5. When the object is sighted, the sight vanes will rotate with respect to the NS end of 

the ring through an angle which the line makes with the magnetic meridian.

6. The reading increase in clockwise direction from 0˚ at south and to 90˚ at west end 

180˚ at north end and 270˚ at east end.

7. Break- pin is placed at the base of the object vane to clamp the oscillation of the 

needle while taking reading.

8. To sight the objects, which are too high or too low, a hinged mirror is placed.

9. Dark glasses are used to sight bright objects. 

Adjustments of prismatic compass:- 

(A) Centering:- 

a) It is the process of keeping the instrument exactly over the station.

b) It is done by dropping a pebble from the centre of the bottom of the instrument. 

(B) Leveling:- 

a) For which the tripod is provided with ball and socket arrangement to fix the compass on

level. 

b) Adjust the box in such a way that the graduated disc is swinging freely and appears to be

level. 


(C) Focusing the Prism:- 

a) The prism attachment is sided up or down till the readings are seen to be sharp and clear. 

B.Surveyors Compass:- 

a) The object vane is similar to that of prismatic compass.

b) The eye vane consists of a simple metal vane with the fine slit without the prism.

c) The graduation ring is directly attached to the box and not with needle.

d) The object is to be sighted first with the object and eye vanes and reading is taken against 

the north end of the needle by looking vertically through the top glass.

e) The card is graduated in quandrantal system having 0˚ at N and S ends & 90˚ at west and east 

ends.


Surveying and Levelling : DETERMINATION OF THE AREA OF CLOSED TRAVERSE : Practical 5

 DETERMINATION OF THE AREA OF CLOSED TRAVERSE

Aim:- 

To find the area of the given boundary by perpendicular offset method.

Instruments Required: 

Chain (30m), Ranging rods, arrows, Pegs, cross staff.

Formulae:- 

Area of the triangle A= ½ bh sq.units.

Area of the trapezium A= ½ h (a+b) sq.units. 

Procedure:-

1. The survey stations are fixed. 

2. To range a line AB, the ranging rods are fixed at the end of the line.

3. The surveyors stand just behind the ranging rod A. The assistant holds a ranging rod at 

point C, approximately on the line AB.

4. Locate the perpendicular offset by using cross staff.

5. Move the cross staff towards left / right.

6. Now base line (AB) is visible and perpendicular line also visible.

7. Perpendicular line measurements are taken.

8. The operation is repeated until the end station of the line is reached.

9. To check the accuracy of the measurement, the line is measured in the reverse direction.      

10. Split the area, by triangle and trapezoidal.

11. Calculate the area by using triangle and trapezoidal formula. 


Result:- 

The area of the field = ………………………………… 

Surveying and Levelling : PLOTTING THE OUTLINE OF THE GIVEN BUILDING-CROSS STAFF SURVEY : Practical 4

 PLOTTING THE OUTLINE OF THE GIVEN BUILDING-CROSS STAFF SURVEY


Aim:-

To plot the plan of an existing building by running a closed chain traverse and to find the 

area of the plot. 


Instruments Required:-

Chain, Cross staff, optical square, ranging rods, arrow & tape. 

Procedure:- 

1. Range and chain the lines around the given building to form a rectangle in clockwise/anti

clockwise direction. 

2. Measure all the offset points (Perpendicular/ Oblique) from the chain line.

3. Plot the building in a drawing sheet with suitable scale.

4. Subtract the un-built up area (open space) of the plot from the total area of the plot to find 

the built up area of the building. 


Result:- 
The plan of the building is plotted as shown in figure. 
Area of the plot   (a) =……………………


Area of the open space (b) = ……………………

Area of the building =     (a)-(b) = ……………………


Surveying and Levelling : STUDY OF CHAIN AND TAPE AND ACCESSORIES USED FOR CHAIN SURVEYING : Practical 3

 STUDY OF CHAIN AND TAPE AND ACCESSORIES USED FOR CHAIN

SURVEYING 


DESCRIPTION OF THE INSTRUMENTS:- 


A) Chain:- 

1. The chains are made in lengths of 30 meters/20 meters.

2. The brass tallies are fixed at every 5m length.

3. Small brass rings are provided at every one meter length.

4. It is composed of 100 or 150 pieces of galvanized mild steel wire of 4mm in 

diameter called links.

5. The ends of each links are bent into a loop and connected together by means of 3 

oval rings which give flexibility to the chain.

6. The length of each links is 20cm i.e. the distance between 2 consecutive middle 

rings.

7. The end of the chains is provided with brass handle for dragging the chain on the 

ground.

8. The chain length is measured from the outside of one handle to the other.

9. To hold the arrows in the position with the handle of the chain a groove is cut on 

the outside surface of the handle.

B) Ranging rods:- 

1. They are usually of 2m or 3m in length.

2. They are in circular cross section and having alternate black, white and red bands of 

20 cm length each to make them visible at a distance.

3. They are used for ranging the lines and for marking the positions of points on the 

ground.

C) Arrows:- 

1. They are made of a steel wire of 4mm diameter for 40cm length.

2. They are pointed at one end for inserting into the ground and bent at the other end 

for facility of carrying.

3. They are used to mark the end of each chain during chaining. 


D) Offset rods:- 

1. These are used for measuring rough offsets.

2. They are round rods with pointed end on one side and provided with notch or a 

hook at the other to facilitate pulling the pushing the chain through obstructions.


E) Cross staff:-

1. It consists of a wooden block with two fine sow cuts at right angles to each other on 

the top.

2. It is used to set a perpendicular at a given point on the chain line.

3. The head is fixed to a top of an iron staff with pointed end to drive into the ground. 

F) Optical square:- 

1. This is also used to set a perpendicular with more accuracy.

2. This has 2 mirrors placed at an angle of 45  ۨ to each other.

3. By means of reflection we can see the ranging rods along the chain line and the 

offset point at right angles to the chain lines simultaneously.  


Surveying and Levelling : SURVEY STATIONS : Practical 2

 SURVEY STATIONS 


SURVEY STATIONS 

 Survey stations are the points at the beginning and at the end of the chain line. They may

also occur at any convenient position on the chain line. Such stations may be :

(a) Main stations (b) Subsidiary stations (c) Tie stations 

(a) Main stations : Stations taken along the boundary of an area as controlling points

known as ‘main stations’. The lines joining the main stations are called ‘main survey

lines’. The main survey lines should be cover the whole area to be surveyed. The main

stations are denoted by ‘ ’ with letters A,B,C,D, etc. 


(B) Subsidiary stations : Stations which are on the main survey lines or any other survey
lines are known as ‘Subsidiary stations’. These stations are taken to run subsidiary lines
for dividing the area into triangles , for checking the accuracy of triangles and for
locating interior details. these stations are denoted by ‘ ‘ with letters S1, S2, S3, etc. 
(c) Tie stations : These are also subsidiary stations taken on the main survey lines. Lines
joining the tie stations are known as ‘tie lines’. Tie lines are taken to locate interior
details. The stations are denoted by ‘ ’ with letters T1 , T2 , T3 , etc. 
(2) MAIN SURVEY LINES : The lines joining the main stations are called ‘main
survey lines’ or chain lines in fig. AB,BC,CD and DA are the main survey lines. 


(3) BASE LINE : The line on which the framework of the survey is built is known as the
‘base line’ . It is the most important line of the survey .Generally , the longest of the main
survey line is considered as the base line. This line should be measured very carefully and
accurately. In fig. BD is the base line 


(4) CHECK LINE : The line joining the apex point of a triangle to some fixed points on
its base is known as the ‘check line’. It is taken to check the accuracy of the triangle .
Sometimes this line is helps to locate interior details .In fig.CS1 , AS2 are the check lines.
(5) TIE – LINE : A line joining tie stations is termed as a tie line. It is run to take the
interior details which are far away from the main lines and also to avoid long offsets. It
can also serve as check line. In Fig. T1 T2 is the tie line. 


PROCEDURE: 
 (1) Fix station A and B at some distance by fixing wooden peg to determine horizontal
distance between them.  
(2) Position of station A and B is fixed by measuring their position from at least three
permanent objects and location sketch of station A and B are drawn.  
(3) The follower holds one handle of the chain in contact with peg at station A.  
(4) The leader takes the other handle of the chain, arrows and ranging rod & walks in the
forward direction dragging chain with him.  
(5) After the chain is stretched completely along the line the follower steps on one side of
the line with the ranging rod touching the handle.  
(6) The follower directs to leader to stand exactly in the line. The leader puts a scratch at
the position & inserts an arrow. He then moves forward with the chain handle with the
remaining arrows and ranging rod till the follower reaches the next arrow point. 


Surveying and Levelling : CHAIN SURVEYING : Practical 1

         Chain surveying is the type of surveying in which only linear measurements are taken in the

field. This type of surveying is done for surveys of small extent to describe the boundaries of plot

of land to locate the existing features on them. 

         It is the method of surveying in which the area is divided into network of triangles and the

sides of the various triangles are measured directly in the field with a chain or a tape and no

angular measurements are taken. 

        Chains are the measuring instrument used in surveying formed by the 100 links of 4mm

galvanized mild steel wire. These links are joined by 3 circular or oval wire rings. These rings

provide the flexibility to the chains. 

        Every aspect of the life requires some measuring units. Measurements are used to do the

work precisely and accurately. Let it be from kitchen to office, everywhere measurements are

used. So as in engineering calculation or measurements holds a very greater role in construction

or surveying or any other aspect. 

        There are various units of measurements such as meters, centimeters, feets, inches, acre,

yards and the list goes on. Same as units there are various instrument used in the measurements

of any entity. One of the instruments used in measurement are chains. 


Parts of Chains used in Surveying

        The chain consists of many small parts used for handling or reading the measurements. 

        Every aspect of the life requires some measuring units. Measurements are used to do the

work precisely and accurately. Let it be from kitchen to office, everywhere measurements are

used. So as in engineering calculation or measurements holds a very greater role in construction

or surveying or any other aspect. 

        There are various units of measurements such as meters, centimeters, feets, inches, acre,

yards and the list goes on. Same as units there are various instrument used in the measurements

of any entity. One of the instruments used in measurement are chains. 

Parts of Chains used in Surveying

       The chain consists of many small parts used for handling or reading the measurements. 

o At the ends chain is provided with brass handle with swivel joint so that it can be easy to roll or

unroll the chain without twisting and knots. 

o At every 10th link is provided with a tally of one teeth, 20th link with a tally of two teeth and soon till 40th link. This is provided for the easy reading of measurements. 

o At the center of the chain is provided with a circular talley used for easy reading. 


Types of Chains used in Surveying

Depending upon the length of the chain, these are divide into following types, 

1. Metric chains 

2. Steel band or Band chain 

3. Gunter’s chain or surveyor’s chain 

4. Engineer’s chain 

5. Revenue chain 

A. Metric chains

Metric chains are the most commonly used chain in India. These types of chains comes in many

lengths such as 5, 10, 20 and 30 meters. Most commonly used is 20m chain. Tallies are provided

at every 2m of the chain for quick reading. Every link of this type of chain is 0.2m. The total

length of the chain is marked on the brass handle at the ends. 

B. Steel band or Band chain

These types of chain consist of a long narrow strip of steel of uniform width of 12 to 16 mm and

thickness of 0.3 to 0.6 mm. this chain is divides by brass studs at every 20cm or instead of brass

studs, band chain may have graduated engraving as centimeter. 


For easy use and workability band chains are wound on steel crosses or metal reels from which

they can be easily unrolled. These steel bands are available in 20m and 30m length and the width

of about 12-16mm. 

C. Gunter’s chain or surveyor’s chain

Gunter chain comes in standard 66ft. These chain consists of 100links, each link being 0.66ft or

7.92inches. The length 66ft is selected because it is convenient in land measurements. 

10 square Gunter’s chains = 1 Acre 

10 Gunter chains = 1 Furlong 

80 Gunter chains = 1 mile 

D. Engineer’s chain

This chain comes in 100ft length. It consist of 100 links each link being 1ft long. At every 10

links a brass ring or tags are provided for indication of 10 links. Readings are taken in feet and

decimal. 

E. Revenue Chain

The standard size of this type of chain is 33ft. The number of links are 16, each link being 

2  ft. This chain is commonly used in cadastral survey. 

PRINCIPLE OF CHAIN SURVEYING 

 The principal of chain surveying is to divide the area into a number of triangles of

suitable sides.  

 As a triangles is the only simple plane of geometrical figure which can be plotted from

the lengths of the three sides even if the angels are not known. 

 A network of triangles (triangulation) is preferred to in chain surveying.

 If the area to be surveyed is triangular in shape and if the lengths and sequence of its 

three sides are recorded the plane of area can be easily drawn. 


PROBABLITY FOR IIT JEE : Sample space and Sample Point: EPISODE 2


Sample space and Sample Point

 A set whose elements represent all possible outcomes of random experiments is called sample space and usually represented by S

An element of a sample space is called sample point

Consider the experiment of tossing a die , if we are interested in number that show on top face than sample point should be S =  {  1,2,3,4,5,6}

If we are interested only in whether is even or odd, then sample space is simply S= { even ,odd}

In a general it is desirable to use  a sample space that gives the maximum information concerning the outcomes of experiment

Suppose three items are selected at random from manufacturing process. each item is inspected and classified as defective or non-defective. the sample providing maximum information will

                         S=  {  NNN , NDN , DNN,NND,DDN,DND,NDD,DDD}

Second Sample Space Although   It Provides Less Information Might Be

S= {0,1,2,3}

Where The Elements Represent No Defectives, One Defective , Two Defectives , Or Three Defectives In Our   Random Selection Of Three Items


Sunday, 24 November 2024

PROBABLITY FOR IIT JEE : RANDOM EXPERIMENT: EPISODE 1

 Often experiments are performed in order to produce observation or measurements  that assists us in arriving at conclusion .these  recorded information's in its original  collected form are referred as " raw data"

                                         MATHEMATICIANS define experiments as any process or operation that generate raw data .if a chemist run an analysis  several times under the same experiment condition , he will not get concurrent result which will indicate an elements of chance in experiment procedure . it these chance outcome that occur around us with which probability is a basically concerned 

RANDOM EXPRIMENT 

AN Experiment whose all possible outcome are known in advance but outcome of any specific  performance can not be predicted before the completion of experiment is known as random experiment 


An example of random experiment might be  tossing a coin , the experiment consists of only two outcomes head or tail . 

Another example might be  launching of a missile and observing the velocity at specific times . the opinion of voters concerning a new sales tax can be considered as outcome of random experiment 

Monday, 18 November 2024

Earthquake Engineering and Disaster Management

 Dear Students 

In this blog series  introduction to disaster management and brief of earthquack engineering has been explored  . i hopes it will surely help not only to undergraduates students but also to research scholars and post graduate students 

https://tarungehlots.blogspot.com/2024/11/disaster-management-introduction.html


https://tarungehlots.blogspot.com/2024/11/earthquake-introduction.html


https://tarungehlots.blogspot.com/2024/11/indian-standards-on-earthquake.html


https://tarungehlots.blogspot.com/2024/11/basic-concepts-of-earthquake-resistant.html


https://tarungehlots.blogspot.com/2024/11/some-of-important-considerations.html


https://tarungehlots.blogspot.com/2024/11/seismicity-concept-of-seismic-zoning.html


https://tarungehlots.blogspot.com/2024/11/earthquake-intensity-their-scales.html

https://tarungehlots.blogspot.com/2024/11/structural-systems.html

https://tarungehlots.blogspot.com/2024/11/elastic-rebound-theory-of-rupture.html


https://tarungehlots.blogspot.com/2024/11/measurement-of-ground-motion.html


https://tarungehlots.blogspot.com/2024/11/magnitude-and-energy-of-earthquake.html

https://tarungehlots.blogspot.com/2024/11/cause-of-earthquake.html

https://tarungehlots.blogspot.com/2024/11/base-shear.html

https://tarungehlots.blogspot.com/2024/11/fundamental-period-of-buildings.html

Correlation between Compressive Strength of Concrete and Rebound Number

 The Schmidt rebound hammer is basically a surface hardness test with little apparent theoretical relationship between the strength of concrete and the rebound number of the hammer. Rebound hammers test the surface hardness of concrete, which cannot be converted directly to compressive strength. The method basically measures the modulus of elasticity of the near surface concrete.. The distance travelled by the mass, expressed as a percentage of the initial extension of the spring, is called the Rebound number. This is simple, handy tool, which can be used to provide a convenient and rapid indication of the compressive strength of concrete. It consists of a spring controlled mass that slides on a plunger within a tubular housing. The method is based on the principle that the rebound of an elastic mass depends on the hardness of the surface against which mass strikes. When the plunger of rebound hammer is pressed against the surface of the concrete, the spring controlled mass rebounds and the extent of such rebound depends upon the surface hardness of concrete. The surface hardness and therefore the rebound is taken to be related to the compressive strength of the concrete. The rebound value is read off along a graduated scale and is designated as the rebound number or rebound index. The compressive strength can be read directly from the graph provided on the body of the hammer.

Table 1 : Impact Energy of Rebound Hammers (As per IS 13311 Part 2)

S.

No.

Applications

Approximate       impact       energy

required for rebound hammers (N- m)

1.

For testing normal weight concrete

2.25

2.

For light weight concrete or small and impact sensitive part of

concrete

0.75

3.

For testing mass concrete   i.e. in roads ,airfield pavements and

hydraulic structures

30.00

                              Table 2 :  Rebound Hammer types, impact energy and grade of concrete


Hammers type

Grade /type of  concrete

Impact energy (N-m)

N

M-15  to M-45

2.2

L

Light weight concrete

0.75

M

Mass concrete

30

P

Below M-15

<2.2


  Correlation  between  Compressive  Strength  of  Concrete  and  RebounNumber: The most satisfactory way of establishing a correlation between compressive strength of concrete anits rebound number is to measure both the properties simultaneously on concrete cubes. The concrete cubes specimens are held in a compression testing machine under a fixed load, measurements of rebound number taken and then the compressive strength determined as per IS 516: 1959. The fixed load required is of the order of 7 N/mmwhen the impact energy of the hammer is about 2.2 N-m. The load should be increased for calibrating rebound hammers of greater impact energy and decreased for calibrating rebound hammers of lesser impact energy. The test specimens should be as large a mass as possible in order to minimize the size effect on the test result of a full scale structure. 150 mm cube specimens are preferred for calibrating rebound hammers of lower impact energy (2.2 N-m), whereas for rebound hammers of higher impact energy, for example 30 N-m, the test cubes should not be smaller than 300 mm. If the specimens are wet cured, they should be removed from wet storage and kept in the laboratory atmosphere for about 24 hours before testing. To obtain a correlation between rebound numbers and strength of wet cured and wet tested cubes, it is necessary to establish a correlation between the strength of wet tested cubes and the strength of dry tested cubes on which rebound readings are taken. A direct correlation between rebound numbers on wet cubes and the strength of wet cubes is not recommended. Only the vertical faces of the cubes as cast should be tested. At least nine readings should be taken on each of the two vertical faces accessible in the compression testing machine when using the rebound hammers. The points of impact on the specimen must not be nearer an edge than 20mm and should be not less than 20 mm from each other. The same points must not be impacted more than once.


https://www.youtube.com/TarunGehlot